Note from Mike P: This guide is guest written by Samuel Pope, a friend of Warphammer and the #1 Tyranid player from last season. He’s taken his beloved bugs into a hostile meta and done extraordinarily well, winning GT’s and achieving top finishes at some of the largest events in the world. He combines top tier competitive insight with a really great attitude to the game. I consider myself lucky that we get to share this unparalleled insight into Tyranids with you here at Warphammer.
I’ve done some very minor editing to help Sam’s content fit better into the website structure, but this is all Sam’s work. Please make sure to show Sam some love in the comments here or wherever you find this! Enjoy!
Introduction

Welcome to the Endless Swarm.
Should Games Workshop have made an army of pillow-fisted, 6-point Khorne Berzerkers? You tell me. All I know is they dropped a pretty little present in my lap with this detachment, and I have been happy to take ‘er for a spin. And boy howdy, do they spin. I’ve taken it upon myself to share with you how to play the most unique playstyle of 40k you can play right now. I do hope all you Warphammer regulars don’t mind a change from our usual Chaos while Mike figures out how to convince you that AdMech counts as Chaos if you play it chaotically enough (note from Mike: I admit it, I picked up AdMech recently to add some variety to my all Chaos collection. Do I wish I had started Tyranids instead of AdMech as my side army? Yes)
To give my advice a hint of credibility, I have been playing swarm-style Tyranids since the edition started, managing to score a 10th place finish at NOVA, a couple undefeated runs at GT’s in the northeast, and, most recently, a 3rd place finish at LVO. Given that Tyranids haven’t been crazy popular competitively this past year, these placements earned me the final placement of #1 ranked Tyranid player per the ITC rankings. Yippee!
Now that my own horn has been tooted, I will turn myself over to the Hive Mind.
Overview
I want to get this out of the way first and foremost: unending swarm is interpreted as a stat-check, counter-meta archetype, where you catch people who tech for big, tough units or elites unaware and win off of that. And sometimes, that’s the case. Sure, you can run into anti-tank aeldari or certain sororitas builds, and just win because they can’t possibly kill enough of you to stop you from denying primary for four out of five turns of the game. But if you take anything away from this article, take away this: Unending Swarm lists, 90% of the time, are not a binary, “either they have enough anti infantry or they don’t” type of playstyle. I find by and large that the way this archetype plays is much more engaging and nuanced than that.
If played right, this archetype should be enjoyable for your opponent to play with, as they stretch their brain to its maximum potential to deny you any opportunities to score points and do their best to score their own points, all while mowing down swarms of bugs like a licensed exterminator. The list has some weaknesses that might not be super obvious that most factions can take advantage of, and after almost every game my opponents will say that they learned a lot and have a good idea of what they want to try next time we play. So play it nice, and without any gotchas, and it should be good fun.
As a last note, I understand that playing the endless swarm might not be for you. There’s not really another faction that can make this style of play work competitively (especially now that Jackal Spam World Eaters got nerfed) so looking at playing it can be daunting and, for some, unappealing. I think that this article will still give you cool tricks to use and apply to whatever army you may run, and at the very least, it will give you an idea of how to play into this archetype should you run into it in the wild.
Rules
When you roll up to the table and either you or your opponent is playing unending swarm, the first step is making sure everyone understands how your army works. To assist in that, I’m going to list the rules of this detachment in the order that I explain them to my opponent. Feel free to use this as a checklist for understanding how it works.

- All relevant rules only apply to “Endless Multitude” units (Detachment Rule & Strats)
- Gargoyles, Termagants, Hormagaunts, Neurogants.
- Surge Moves: When a model in one or more of my swarm units is killed in a shooting attack, the affected unit(s) can make a “surge move” D6” as close as possible toward the closest enemy unit. That surge move can/will:
- End in engagement range (preventing most further shooting).
- Be done multiple times a phase.
- Be done in any phase, which allows me to move after overwatch.
- Allow all models except the closest model to move in whatever direction they want, as the rule specifies that the unit must end as close as possible, not every model.
- Be done after removing models, which can help influence where the unit has to go.
- Go towards an objective instead for 1 CP (Not a battle tactic).
- Stratagems (Mention that the bolded stratagems are battle tactics if you have a tyrant or they have a vect):
- 2 CP Respawn full unit into reserves. Important Notes:
- Any phase.
- When the unit is destroyed.
- Not Battle Tactic.
- Can be done multiple times in the same turn, just not in the same phase, of course.
- Gargoyles get to deepstrike, everything else comes from strat reserve.
- -1 To Hit, Melee or Shooting
- Auto 6” Advance
- Sustained Hits, which crit on 5’s if the unit has 15+ models.
- Blast doesn’t work: When a unit is targeted, that unit counts as less than five models for the purposes of blast for the rest of the phase.
- Can surge toward objective and can reroll surge die.
- 2 CP Respawn full unit into reserves. Important Notes:
As you can see, the goal is to give your opponent not just the base rules, but the context of those rules and how they apply to your list and your opponent’s list. Here’s some other rules I like to mention related to my units:
- Every swarm unit except for the neurogants are OC 2.
- Hive tyrant gives free strat per turn not per round, to any units within 12”. Go to ground works on this, which gives your swarm units a 6++ to shooting.
- Gargoyles move 6” after shooting, which lets them move an auto 24” using the 6” auto advance strat, and allows them to do a worse 3” deep strike after respawning (spawn 9”, move 6 after shooting).
- Hormagaunts have a threat of 16” + charge, given the auto 6” advance.
- Tervigon respawn happens in command phase, so can toe units forward onto objectives to score them.
- Venomthropes give stealth to all infantry within 6”, not fully within, so units can string back to them for bonuses.
How It Plays
This detachment is quite good because it’s so dependable. You can take deploy teleport homers and cleanse on most missions for an effective auto-33 on secondaries, and can easily score higher, and if you feel you need CP in a matchup (for the anti-blast strat, for example) you can take tactical secondaries and still feel pretty confident in scoring a lot of them. On primary, you’re likely to score high due to pretty easily maxing your 2nd and 3rd turn scoring a lot of the time, while denying your opponent as much as possible.
Most lists consider their remaining units and their remaining killing power as their main resources. If you lose too much of either, it affects your ability to score points. If you have too few units, you can’t successfully do your secondaries or secure your primaries. If you have too little killing power, you can’t force your opponent off of objectives or remove any of their scoring pieces. Unending swarm is different: our resources are OC, movement, and, in a lot of cases, time.
Objective Control
In Unending swarm, we don’t kill our opponent off of objectives if we can help it. Instead, we just stack 2 OC bodies onto our opponent’s objectives until they no longer control it. This is incredibly strong, because there’s very little randomness. If you have enough termagants within 12” of the point, and your opponent doesn’t have a crazy strong overwatch threat, you can and will stop them from holding that point. No dice rolls necessary.
Because of how many bodies you have, you’ll often be able to score high primary points early in the game, but if you run out of OC too early, your opponent will score too high in the end game and win. So you need to protect your OC. String your units back to venomthropes, zoanthropes, your tervigon, your hive tyrant, anything and everything that can keep the unit alive. If one model manages to survive near a tervigon, that’s suddenly a minimum of 10 OC with a 15” move (including respawn distances) which is often enough to flip an objective. And if you can use your one-model unit, you won’t have to use your twenty model unit, and it can survive into the later game.
Because you can respawn a unit nearly every turn, you only start operating at a “loss” once you lose more than one unit a turn, which is very possible as every turn you have to move units forward to do your secondaries. If you aren’t careful enough, on a general take-and-hold mission, you will score primary like the following: 15-10-5-5, while your opponent will score 5-5-10-15, tying you on primary because you couldn’t deny enough points on the later turns. Respect your OC. Protect it.
Movement

Movement is your friend, and it’s what you’ll spend the most time doing. You can’t treat yourself as having unlimited movement- you have to know how far you can move and how far from objectives you have to stand to be ready to take them. You can have unlimited OC on the board, but if you don’t have enough in the right places, it won’t matter. 100 OC that can’t reach an objective is essentially 0 OC. Especially if you take fixed secondaries- I can’t count how many times I set up a squad too far away to cleanse an objective because I had another unit nearby that I thought would survive. Once that unit died, I didn’t have a backup and I lost two points. Any unit that can, should be within movement distance of as many objectives as it can be.
Similarly, if your units aren’t set up to threaten objectives, opponents can start whittling down your units while also contesting points. If you use your movement phase correctly, this shouldn’t happen- if your opponent wants to step on a point, and doesn’t have the capabilities to remove a swarm unit in one shot, you should have a swarm unit within surge distance of any point on the objective. That way, if they try to clear you off of it, you can reactively pull models from elsewhere to surge forward, tag the offending objective-stealer, and stop it in its tracks.
The temptation is to just push forward with all your models, but if you’re playing a good unending swarm list, I think that’s a mistake. Your opponent can waste a turn or two shooting into your swarms, and then push in and take over primary in the late game once they’ve depleted your contesting capabilities. Similarly, it’s important to string out your units long enough to, once they’re shot at, decide where to pull from so as to increase their effectiveness. If you push too far forward, you can’t pull your models in a way to hide them from hostile fire.
Instead, you need to focus on increasing your effective movement by limiting your opponent’s movement. If you’re playing against a melee army, you can string a single unit in a long line parallel to your opponent’s army to limit their charge targets. If you’re playing against a shooting army, move-blocking or tagging the big shooting pieces in melee to limit their line of sight is very relevant. More on these later, but if you utilize these effectively, you can set up safer zones of the board to push into and make your movement even more effective.
It’s Time to Talk About Time (And Chess Clocks)
Look, you can’t talk about a swarm list and how to play it and play against it without mentioning time. I am going to reveal something that may shock a lot of you: it is more common for my opponents to time out than myself. Think about it this way: to kill one of our swarm units, our opponent often has to roll a lot of dice, from a lot of different units, each one both needing to hit and wound, often with rerolls. I, on the other hand, have to make saves (almost always less dice than hit and wound amounts) and sometimes move, and I usually don’t bother making attacks in response, because most of those bugs don’t do a whole lot of damage.
Playing into swarm lists ends up sucking up a lot of time, which is already tight because most people aren’t sure how to approach a list like this, and want to think it through while they play. So please, if you end up playing into a swarm player, really be careful about your time. If you aren’t already on a clock, and you decide to put yourselves on one, realize that this is a challenge to both of you, not just a constraint on the swarm player.
For my swarm players, that doesn’t mean you get to ignore the time. It’s a resource you have to consider every time you make any action in any phase. Termagant shooting can plink 5-6 wounds off anything with a 3+ save or worse, so it’s tempting to shoot them just because you can, and “might as well.” However, you should save your shooting for things that can affect your scoring potential- don’t spend 60 seconds shooting termagants into a sagitaur, it’s not going to do enough damage to you to matter in the long run. Do spend 60 seconds shooting into thunderkyn or chosen. You don’t even have to kill an entire squad, you just have to cut out their ability to pick up an entire unit. Some larger anti-elite like exocrines can be useful to lower the time you have to spend on this.
It’s not just shooting, but also movement that you’ll have to consider when saving time. This list can “move” in every phase in the game but one – your opponent’s command phase. And it’s tempting to take every bit of movement you can get to push upwards or threaten certain angles. But you have to continue asking yourself the question “does this matter?” If the action won’t score you points in the long run, don’t take it. You’ll gain a feeling for when these times are and when they aren’t by practicing and gaining experience.
Also, organize your sideboard. When models die, set them up, organized, divided by unit, off the board edge. When the unit is finished off, if you want to respawn them, you can easily find all your models to put in reserves. If you don’t respawn them, you can count the models in the destroyed squad to make sure you aren’t leaving any models on the table by accident. Make it clear to your opponent which models are in reserve, and which are destroyed, so they can at a glance see what you have coming in. This is good for your time and a kind way to make the game easier for your opponent.
My last point is this: I would say 95% of the outcomes of the games I play on swarm are not affected by the clock. If you play smart and well, you will always have time to finish at least round 3, and this list usually can tell whether it’ll win or lose by the end of round three. If it’s clear I don’t have enough to score points moving forward, I’ll concede. It’s rare (but still more common than with other lists), but If my opponent and I both agree that the outcome is unclear and one player is out of time, call a judge. Don’t try to do it yourself. It’ll just cause you and your opponent undue stress.
Tricks and Combos
Let’s get into the nitty gritty: fun tools and tricks you can add to your toolbelt to win games.
- Hive Tyrant: Either the winged or walking hive tyrant I think is a no-brainer to add to endless swarm lists. We’ve got great battle tactics and really want to spend our 2 CP every round on the respawn. Many people like the swarmlord for the definite 1 extra CP every round, but I personally prefer 2CP worth of strats for cheaper, along with the possibility of getting a CP from a lictor or ditching a secondary. Trust me, take the tyrant.
- Gargoyles: I take a 20-strong gargoyle squad and against almost every opponent, deploy it spread out on the line turn 1. Here’s why:
- If you go first, those gargoyles immediately move 24” (the width of the deployment zone) and move-block your opponent into their deployment zone. When they die, they drop in next turn, shoot 6”, and limit your opponent to 2” of movement. Of course overwatch & fly stop this from working perfectly every time, but it always gets value.
- If you go second, you get an extra CP to spend: you won’t get to respawn this turn, and by the time you get to your opponent’s next turn you’ll have 3 CP. That one free CP can go into turning off blast against your gargoyles. Without blast, there aren’t many units in the game that can pick off all your gargoyles in one activation from 24” away with -1 or -2 to hit (to cancel out any +1 to hit). And then you get to pull out of LOS and range with the ones that died, and use whatever’s left on your next turn for secondaries and smaller move-blocking. Value!
- Hormagaunts: I like to take at least some of these because having some melee threat range is extra relevant when playing shooting armies like aeldari. It’s very nice to say “You have to stay 24” away from these to avoid getting tagged on average. And if you shoot them, you have to stay even farther away as I surge forward.” I’m considering trying to run 10-model large units for more flexibility, but I haven’t tested it yet, so don’t listen to me.
- Termagants: There are an insane amount of buffs you can pour into these to make them deal damage to anything with a 3+ save or worse. Near a tervigon for lethal hits, with rerolls from an exocrine, with sustained hits that crit on 5 from the strat, with +1 to wound from a neurolictor, one squad of twenty termagants with 18 spinefists and 2 stranglethorns does 9.5 wounds to a C’tan. Obviously battleshocking a C’tan isn’t super dependable, but it’s not that rare that it won’t matter. And you don’t always need to shoot C’tans.
- Lines: If you string out gargoyles as far as they can go, max coherency, they can stretch for nearly 57” of space. Termagants and Horms are a bit smaller, but still huge. If you stretch out like this, units without fly will be trapped behind you in the movement phase. To block out melee units, you have to make sure the spaces in between your models aren’t larger than the charging unit’s bases. As long as it’s smaller, the charging unit will be stuck on the other side, making any space more than 4” back from the front of the line a safe place to be to avoid being tagged in melee.
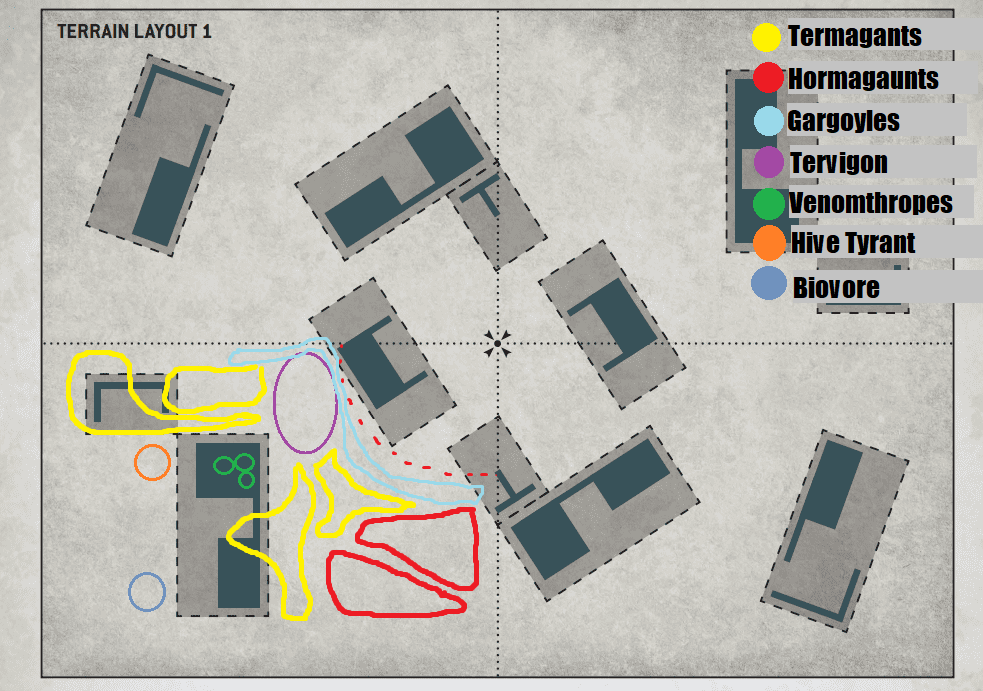
Deployment
When deploying the swarm, here’s what you should do. Your support pieces will always be hiding in your safety castle, and every swarm unit will string back to be within their support range. Gargoyles will deploy on the line, the tervigon will deploy usually behind a front piece of terrain, and termagants will flank her on both sides. Hormagaunts should be set up to threaten the farthest no-man’s land objective from you, because if your opponent goes first and steps on, and you don’t have the movement to threaten it, you give up 5 points.
If you are bringing some damage pieces like exocrines, you should usually start them in strategic reserves, unless you’re playing against a melee focused army, like Orks or custodes, in which case they should start on the board, protected by a wall of little bugs. Neurolictors should be as far forward as possible while still being completely outside your opponent’s threat range. Ask your opponent about their threat range- often you’ll just end up plopping them in your deployment zone.
See an example deployment for a basic endless swarm list below:
Matchups
Our worst army matchups are armies that can pick up 3+ swarm units in one turn, and armies that have lots of movement tricks. As endless swarm players, we like to limit where our opponent can go and step on their toes all while scoring lots of points. If we die too quickly or can’t limit movement, the matchups get a whole lot harder. Luckily, there’s very few, if any, armies that can do both. Unluckily, nearly every faction can do some. Moveblock the killy armies, overwhelm and tag the movement armies, and do both to hybrid armies.
In actuality, our worst matchups aren’t limited to armies. They find themselves nestled in the Leviathan Mission Pack- those pesky primary missions. Here’s a ranking of our primary mission capabilities, in order:
A Tier, Good Missions
- Take and Hold (Easy to deny primary, easy to score primary. Win-win)
- Sites of Power (We don’t have crazy good characters, but we can still deny primary and score just fine)
- Vital Ground (Somewhat annoying for taking Cleanse, but still great Primary denial and scoring capabilities)
B Tier, Fine Missions
- Scorched Earth (You can still build up a lead early here, but being limited to 10 points/round limits how far that can go)
- Priority Targets (Same as Scorched Earth, but big scoring at the end hurts lists like ours that sometimes run out of steam later)
- The Ritual (Easy Cleanse is nice as you can cleanse an objective you spawn the same turn, but there’s only so much you can do to deny primary, so often the goal is to hold your opponent to a 0 on primary turn 2, and then hold that small lead until the end of the game as you both score max the rest of the game)
C Tier, Bad Missions
- Supply Drop (If you hold your opponent to 0 points on primary for turns 2-4, and you hold one objective for turns 2-4, but your opponent gets one on turn five and you don’t, you only get 3 points ahead of them on primary. This often happens, or worse, you only hold one objective for turns 2-3, and can’t hold it for turn 4. Then you’re add a primary disadvantage.)
- Servo Skulls (IDK. I think this mission is go first, win, go second, lose. And we already do that a bit. Don’t ask me, I’ve only played it one time.)
F Tier, Terrible Day
- Purge the Foe (Worst mission ever. Puts swarm at an immediate disadvantage. Rare to hold more, nearly impossible to kill more. Have to hope your opponent feeds you a unit to kill on the first turn after they don’t kill any themselves, and then maybe blank their primary once. Hard. Terrible.)
List Construction
When constructing an Unending Swarm list, I believe that there are actually very few “requirements.” I would say the base of any good Unending Swarm list should be the following:
- Winged Tyrant: 210
- Neurotyrant: 105
- 1×20 Gargoyles: 160
- 3×20 Termagants (Spinefists & Stranglethorns, if possible) 360
- 1×3 Venomthropes: 70
- 1x Biovore: 75
This small list puts you at 980 points. I recommend at least three more full swarm units of whatever your favorite flavor of gant or goyle is, as everyone has different preferences. Maybe you like to have 2×20 gargoyles so you can let a unit die early and save the CP of the respawn. Maybe you like 6×20 termagants to focus on objective play. Maybe you like 2×20 hormagaunts to project a larger threat range and to tie up annoying anti-horde pieces. All swarm units have uses, just find which ones you enjoy playing with the most.
Once you have your swarm base, you can fill in with some specific packages. Here are some of my favorites:
Battleshock Package
- 2x Neurolictor: 160
- [Optional: Deathleaper: 70]
The battleshock package being not an auto-add might be surprising to some, and while I do appreciate the lone-ops and the potential for +1 to wound on my termagants, I don’t think termagant shooting is necessary for the list to perform. It’s certainly useful, though, and if you enjoy the tools it provides, please do it. With the increase in price of the neurolictors, I think you could even just run one to have for your shadow in the warp turn.
Mama Care Package
- 1x Tervigon: 190
- [Optional: More Termagants: 120/unit]
The Tervigon is nice, and the lethal hits that she provides combines really well with the hive tyrant free strats to pump up the damage output of your termagants. The respawn in the command phase really can help pull some squads back from the brink of death to a threat. That being said, the tervigon is a large monster in a sea of little bugs, and can’t just hide in your safe castle if you want to get value out of it. It will draw all the anti-tank shooting your opponent has, which can make it feel awkward.
Supporting Fire Package
- 2x Exocrine: 270
- [Optional: Another Exocrine, Could try a tyrannofex although you won’t have CP to overwatch]
I really have been enjoying 2 or 3 Exocrines as a supporting unit. While swarm damage output isn’t great, I find that most of the units in the game that can threaten full units of gants are elite models. Thunderkyn, Chosen, Custodes, Centurions, Aggressors, Eightbound, Crisis Suits, etc. It’s really nice to pull exocrines out of strategic reserve and pour significant fire into some unsuspecting brick of anti-horde, and in certain melee focused matchups, exocrines can hide behind lines of horde and unleash significant firepower for a long time.
“I Play This Detachment For One Reason” Package
- 3×22 Neurogants: 270
- [Optional: All Available Points into More Swarm]
Look, I think that the list that just runs 400 bodies makes itself better at matchups this archetype is already good at. I can overwhelm someone with a list that doesn’t have a lot of anti-horde with 140 swarm models the same that someone running 400 swarm models can. But if I run 140 swarm models, I can tech in some pieces that make the CSM, Custodes, World Eaters matchup viable and winnable. That being said, neurogants are very cheap for a lot of bodies, and I understand the thought process behind pushing as many of them as possible into a list.
Last Thoughts On Listbuilding
I think wherever you end up, you should aim to have at least two, preferably three lone operatives in your list. These are super useful for forcing your opponent to engage forward, which allows your termagants to get in range and deal damage if necessary. I like a lictor after the balance slate even more, I’ll probably end up running one lictor and 2 neurolictors. But pick your poison. Try stuff out. See what you like.
Example Lists

Here’s an example of an all-rounder list that I’d recommend:
- Winged Tyrant: 210
- Neurotyrant: 105
- Tervigon: 190
- 4×20 Termagants: 600
- 1×20 Gargoyles: 160
- 1×20 Hormagaunts: 130
- Biovore: 75
- 1×22 Neurogants: 90
- 1×3 Venomthropes: 70
- 2x Exocrines: 270
- 2x Neurolictor: 160
- 1x Lictor: 60
Here’s a list that takes a swarm base with minimal support, and then brings as many big guns behind it as it can fit.
- Walking Hive Tyrant: 235
- 1×20 Gargoyles: 160
- 5×20 Termagants: 600
- 1×20 Hormagaunts: 130
- Biovore: 75
- 1×3 Venomthropes: 70
- 2x Lictors: 120
- 2x Exocrines: 405
- 2x Maleceptor: 340
The idea is that the lists that run a bunch of tough vehicles can’t deal with the swarm, and more anti-infantry monsters really help the elite matchups that are hard for the army. Pretty two-note, but I think it would work well.
Here’s another fun one: Invasion Fleet Swarm
- Deathleaper: 80
- Walking Tyrant: 235
- Neurotyrant: 105
- Old One Eye: 140
- Tervigon w/ Adaptive Biology: 215
- 4×20 Termagants: 480
- Biovore: 75
- Carnifexes w/ Deathspitters: 250
- 2x Neurolictors: 160
- Tyrannofex w/ Acid Spray: 190
- Venomthropes: 70
Look, I played the swarm list before the codex came out in Invasion Fleet, and I think it’s still good. The goal here is to keep the Termagants from full dying with Venomthropes and the 5+ feel no pain strat from the Tyrant, and then respawn it up to full using the respawn strat and the Tervigon. The tyrannofex gets to overwatch & old one eye gets to come out to play in force. It’d play completely different than the endless swarm stuff, but the throughline is there.
Wrap Up
Mike Note: Want to talk with Sam, Mike, and over 2200 other player who value both playing their army at the highest level and having fun playing the game? Join the Warphammer discord today! https://discord.gg/3gHbtuWX. I wish this community had been around when I was starting my own competitive 40K journey, and I highly encourage you to come say hi.
Look, this detachment is controversial. A good amount of tyranid players didn’t sign up for swarm board control, and don’t like that it’s one of our most competitive lists currently, because painting and playing with that many models doesn’t seem like fun. And a good amount of competitive players don’t like playing against armies that feel like giant stat-checks. But I think the detachment can feel incredibly fun to play and play against, so I’d ask that you give it a chance.
Playing this detachment will teach you smart movement and careful play. Luck doesn’t play a huge role in how you play- you have most of the information and tools in your pocket from the start. It’s all in how you use them, and in how you don’t. Play fast, play smart, and play like you’re out to have a good time, and nothing can go wrong.
If you want to learn more about the swarm play, I’d look into the podcast episodes I recorded with Nick from Art of War, read my tournament report about NOVA here, or watch a streamed game of mine here.
Good luck and happy biomass-harvesting! Feel free to reach out to me on Discord where I usually chat under the name “Scotch.” No promises I’ll reply but I probably will.
LVO List Name Breakdown
Mike Note: Sam has gotten a lot of comments on his list names, so on the topic of his Endless Swam lists performance, we figured he should get a chance to explain those list name.
For those of you who read this whole thing (crazy), here’s a breakdown of my list name from LVO:
- “More Afraid of You Than You Are of It”
- Bug reference. My bugs aren’t killy. Battleshock reference, kinda? Felt like my most clever title, so it went first.
- “Please Don’t Put Purge the Foe in the Mission Pack It Undoes a Lot Of the Balance of the Game Because Certain Armies Should Have a Harder Time Scoring Primary, and This Has Nothing To Do With the Army I Am Running”
- I could rant about this forever but this sums it up pretty well. All these armies out there that struggle with holding points but kill super efficiently (Post-Dataslate CSM, Aeldari, Votann, Ironstorm) are balanced on the fact that they kill so efficiently that they can score a lot in the late game. If you make a primary mission that rewards those armies for doing what they already want to do, and takes away a big weakness, you have practically thrown a lifejacket followed by a 100-pound weight to a drowning man. Remove this from your mission packs, TO’s. Please.
- “Turns Out I Can Table a CSM List With This in The Right Circumstances”
- If you keep feeding units one by one into my side of the board, and I have infinite time as it’s a practice game…well…Sorry, Seth.
- “The Move Block Gives and the Move Block Takes Away”
- This list loves to moveblock but one of the biggest strategies for beating it is taking tough, 2+ save models and surrounding a point with it. Can’t do much about that.
- “I Got It, You Think This List Is Good But You Would Never Subject Yourself To Playing it, Sounds Like a Bad Case of the Wimps to Me”
- It’s fun to play. Give it a go. My back doesn’t hurt that bad.
- “WYSIWYG is a Nightmare, Why Did Leviathan Only Come With Fleshborers”
- I bought a bunch of termagants for cheap from the leviathan box, painted them all, then bought a bunch of weapons for the termagants secondhand, and had to painstakingly remove all the fleshborers and replace with spinefists and stranglewebs. Reader, this was not worth it. Just run your fleshborers as all spinefists.
- “Look, I’d Rather Be Playing 9th Edition Spore Mine Spam Myself, Let’s Both Take What We Can Get”
- For those not familiar: Take the move-blocking that you can do with endless swarm and pretend that every time you ended a move near them you took 8 mortal wounds. Good times. For me. Fun fact, the meta this was played in (After Leviathan Warrior spam was nerfed through the start of Arcs of Omen, 7 months total), Tyranids only won 8 GT+ sized events. In contrast, in the five months since the previous dataslate, in 10th, Sisters of Battle have won the same number of events (Source – Stat Check Meta Dashboard) Not sure what point I’m making, but that’s crazy. 9th Edition was wild.
- “Cockroach Euphoria”
- Most succinct. Gets the point across. My personal favorite.
Final Thoughts
Mike here to close us out, and holy crap. I’m walking away from reading this really, really wanting to start a Tyranids army. I’m one poker tournament away from loading up my Ebay cart with Gants and getting that ball rolling.
This is the first foray Warphammer has made into non-Chaos content, but it definitely won’t be the last. I’ve met a lot of amazing people and players of different armies that have a lot to contribute to the world of 40K, and I’m excited to get more of them in the mix. Sam set the bar way, way too high, but we’ll still have some fun sharing insight for both competitive and casual players out there.
As always, have fun, stay safe, and may the Dark Gods and the Hive Mind bless your rolls!
Hello ! Thank you very much for the article ! As a Tyranids (and Daemons) player, I really enjoyed to read this article ! Furthermore, I have more than 150 gaunts (Horms, Terma and Goyle) in my collection, so I will test your list in my next game Friday night.
Swarms are so much fun to play, good luck and let us know how it goes for you Tristan!
Hey man great article! What about enhancements? What do you recommend and where and why? Thanks a lot for the write up!
I’ve been running the invasion Fleet version but at 1000 pts (non-comp games thus far).
Tervigon w/ adaptive biology
OOE
50x Termagants w/ spinefists
(Units: 20, 20, 10)
6x Warriors w/ 2xVC, 2xBS, 2xDS
(Units: 3, 3)
3x Venomthropes
Haruspex
Very interesting.
You say:
“But if you take anything away from this article, take away this: Unending Swarm lists, 90% of the time, are not a binary, “either they have enough anti infantry or they don’t” type of playstyle. I find by and large that the way this archetype plays is much more engaging and nuanced than that.”
Do you think that stat checks unending swarms are stronger or weaker than non-stat checks unending swarm armies. That is: would the win rate of unending swarm list improve if the player removes almost everything that is not gaunts and plays only those?
Love this, thanks so much for taking the time to write it, lots and lots of really useful practical insights. The article certainly has given me plenty of food for thought. I have always wanted to build an unending swarm list, but was put off by all prevaling narrative within the Tyranids community. I have no less than 120 gargoyles (i hate transporting them, but sometimes you take the rough with the smooth) so I’ll structure around them.
A super write up. Can I just confirm that Hive Tyrants can do a free strategum on a unit that was destroyed as that unit is no longer on the battlefield and thus aren’t actually within 12 inches of the unit (as it’s off the battlefield). UKTC ruled that Ursula Creed couldn’t use her ability to do Reinforcements for free (before the Battle Tactic rule was introduced) for similar reasons.
Thanks Rich! Great question, as I see the wording is a bit unclear. You can’t use the Hive Tyrant to get free usage of Unending Waves (the resurrection strat), as you seem to know. Sam was saying that the detachment has other great Battle Tactics you can use for free with the Hive Tyrant, and by bringing the Hive Tyrant to make other strats free, you will have more CP to spend on Unending Swarms.
1000 points?
+++++++++++++++++++++++++++++++++++++++++++++++
+ FACTION KEYWORD: Xenos – Tyranids
+ DETACHMENT: Unending Swarm
+ TOTAL ARMY POINTS: 990pts
+
+ WARLORD: Char1: Hive Tyrant
+ ENHANCEMENT:
+ NUMBER OF UNITS: 7
+++++++++++++++++++++++++++++++++++++++++++++++
Char1: 1x Hive Tyrant (235 pts): Warlord, Monstrous Bonesword and Lash Whip, Stranglethorn Cannon
Char2: 1x Tervigon (190 pts): Stinger Salvoes, Massive Scything Talons
20x Termagants (120 pts)
• 2x Termagant
1 with Chitinous Claws and Teeth, Shardlauncher
1 with Chitinous Claws and Teeth, Strangleweb
• 18x Termagants: Chitinous Claws and Teeth, Termagant Spinefist
20x Termagants (120 pts)
• 2x Termagant
1 with Chitinous Claws and Teeth, Shardlauncher
1 with Chitinous Claws and Teeth, Strangleweb
• 18x Termagants: Chitinous Claws and Teeth, Termagant Spinefist
20x Termagants (120 pts)
• 2x Termagant
1 with Chitinous Claws and Teeth, Shardlauncher
1 with Chitinous Claws and Teeth, Strangleweb
• 18x Termagants: Chitinous Claws and Teeth, Termagant Spinefist
3x Venomthropes (70 pts): Toxic Lashes
1x Exocrine (135 pts): Bio-plasmic Cannon, Powerful Limbs
idea is that the Tervigon + Exocrine + Hive Tyrant provide powerful buffs to the Termagants, and the Venomthropes help them not die. we have like 60 shots- all with lethal Hits + sus Hits and RR 1s, crits on 5s, and it looks to be stronk shooting.
I’ve been testing for a GT and feel like having some anti elite power is quite valuable. There are armies that can beat through you to an objective (anyone with fly or large models). Being able to kill blood angels, war dogs, and at least reduce the number of wraiths on the objective can be important. So is the ability to reduce the threat of units that can just wipe your units (those are very few and far between; but ork boyz for example
Couldn’t agree more Ben, and I think Exocrines are basically a perfectly compliment to Endless Swarm for that reason